
A brow tutorial to get you through quarantine
*This post may contain affiliate links, which means I may receive a small commission (at no cost to you) if you make a purchase through my links. Thanks for helping support my makeup habit 🙂
Who else has lost count of the days in quarantine? I know I have! I work from home, and consider myself very lucky that I get to stay home, not that I have to stay home. But, let’s be realistic–there’s something we all miss. Whether it’s walking through Target with a Starbucks in hand or getting your regular pedicure, there’s something we’re ready to resume when it’s safe.
One of the things I know people are missing are those regular brow appointments! I live just far enough from a major city to make it cost prohibitive to always get to a good place to get my brows waxed. I also have the bushiest brows, so just plucking them won’t work. I liked getting them professionally done for the trimming. Trimming my brows helps make it easier to fill them in.
Back in January, I committed to plucking and trimming my own brows at home. After a good bit of practice, I have been able to successfully trim my own and I’m sharing my tips and tricks with you in this brow tutorial:
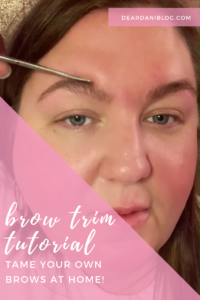
For this brow tutorial, you’ll need:
- A good pair of tweezers. These are my favorite ones! And the pack comes with 3 pairs of tweezers, so it’s a great deal.
- A pair of brow scissors. I have these from Ulta and I think they are great quality.
- A spoolie. This is a cheap pack.
- A magnifying mirror. This makes a HUGE difference in being able to actually see what you are doing! There are tons of options out there. Here are some suggested ones: mirror 1, mirror 2, mirror 3 (this one includes a set of tweezers!)
Brow tutorial: How I groom my brows at home
- I typically do this right out of the shower so that my pores are open. That will make this hurt less!
- I pluck around my brow shape. I don’t pluck ANYTHING from inside my brows. I finally figured out that when I was over plucking my brows in the late 90s, I plucking hairs that actually needed to be trimmed (more on that below).
- Next I pluck in between my brows. Be careful of how far in you pluck. You don’t want to over-pluck the front of your brow. I like to use an eyebrow pencil to line the front of my brow with the inner corner of my eye and make a mark there so I don’t pluck past it.
- Now it’s time to trim. I brush my brows up with the spoolie, then I trim from the corner of my arch and work my way slowly to the front of the brow. I trim a little at a time. Similar to how a hair dresser uses a guide when they cut hair, I use what I’ve trimmed first as a guide to what I trim off as I move down the top of the brow.
- I periodically will brush my brow back up with the spoolie to check my work and go back in and trim anything I missed.
- Remember, trim a small amount. You can always trim off more! Once you trim your brows a couple of times, you’ll get a feel for how much to take off.
- Now that you’ve finished trimming them, go back around the top and side of the brow to pluck off any hairs outside the shape that didn’t get trimmed. Trimming makes it easier to see those short hairs hiding behind those long ones!
I hope this helps you keep your own brows in shape while you’re at home. If this helped you, comment and let me know! Have anything else you need some advice on? Let me know in the comments!